Pada Prasar Paschimottanasana, also known as the legs spread back stretch pose, is a seated yoga posture that offers numerous physical and mental benefits. In this pose, practitioners sit with their legs spread apart as wide as possible, engaging in a series of movements that involve forward bending and stretching. This article provides a step-by-step guide to performing Pada Prasar Paschimottanasana correctly, along with its benefits, variations, breathing techniques, and contraindications.
Step-by-Step Instructions:
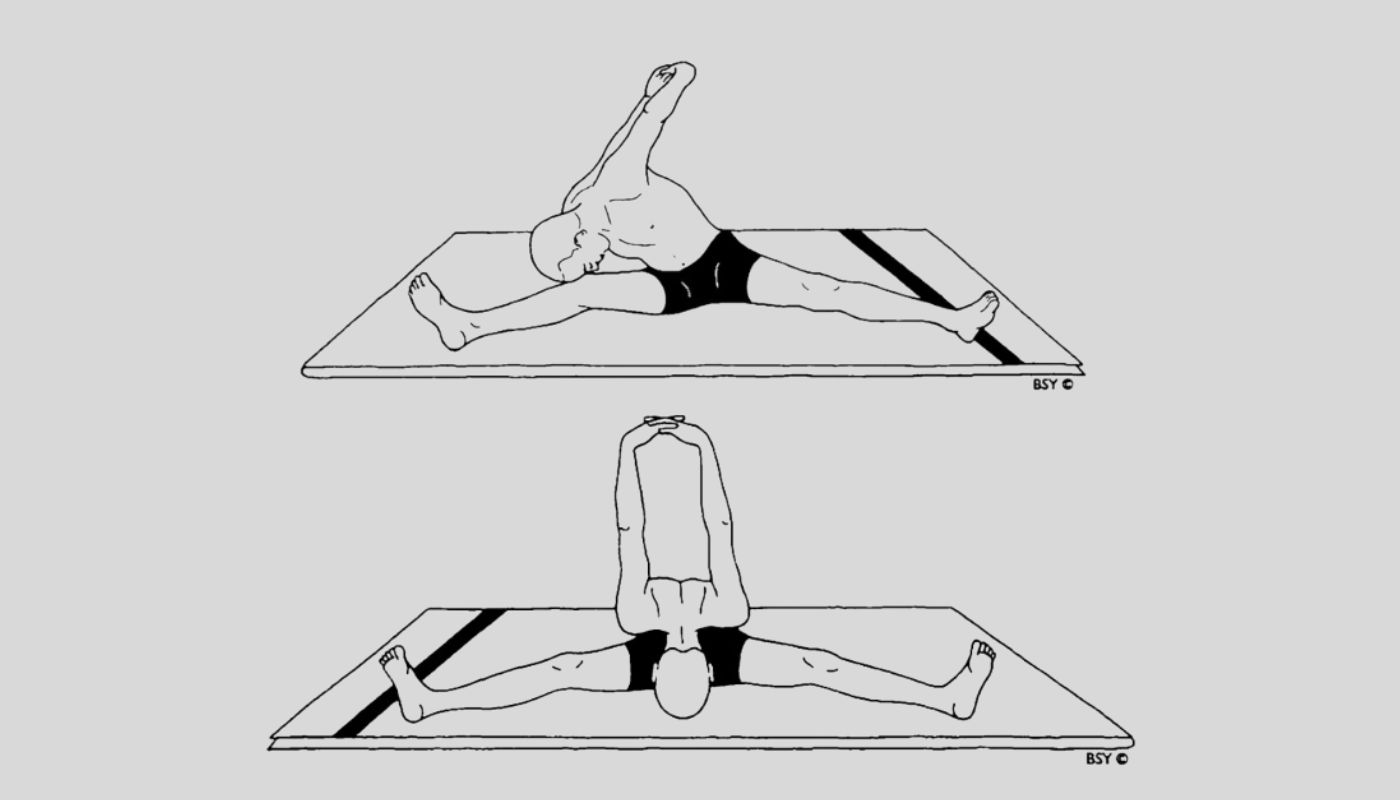
- Begin by sitting on the floor with your legs spread apart as wide as possible.
- Interlock your fingers behind your back, creating a firm grip.
- Turn your trunk to the right and raise your arms up behind your back.
- Bend forward over the right leg, keeping your arms straight and trying to touch your knee with your nose.
- Hold the position for a comfortable duration, then raise your trunk and lower your arms.
- Repeat the movement on the left side.
- Return to the center and bend forward, attempting to touch your forehead to the floor directly in front of your body while raising your arms as high as possible from behind.
- Hold the position for a comfortable duration, then return to the upright position, lowering your arms.
Read More: 200 Hour Yoga Teacher Training in Rishikesh
Breathing Technique:
- Inhale in the starting position.
- Exhale while bending forward.
- Breathe slowly and deeply in the final position or retain the breath out if the position is held for only a short time.
- Inhale while returning to the starting position.
Duration and Awareness:
- Aim for 3 to 5 rounds of Pada Prasar Paschimottanasana.
- Focus your awareness on synchronizing the movement with your breath.
- Cultivate spiritual awareness on the mooladhara or swadhisthana chakra.
Sequence and Contraindications:
- Pada Prasar Paschimottanasana should precede or follow backward bending asanas such as tiryaka bhujangasana, chakrasana, or matsyasana.
- Avoid this asana if you have any contraindications similar to those for paschimottanasana. It’s crucial to master paschimottanasana before attempting Pada Prasar Paschimottanasana.
Benefits:
- Provides similar benefits to paschimottanasana, including stretching the back muscles, hamstrings, and spine.
- Offers an extended stretch to the inside of the legs and the muscles under and between the shoulder blades.
- Opens the chest more effectively than paschimottanasana, benefiting both the upper and lower parts of the body.
Variation:
- Assume the same starting position with hands in front of the body on the floor.
- Slowly bend forward and grasp the big toes with your fingers.
- Aim to place your forehead on the floor directly in front of your body.
- Gradually bring your chest, abdomen, and pelvic region to the floor, raising your head to align the throat and chin on the floor.
- Hold the position for a comfortable duration, then release the hands and return to the starting position.
Additional Note :
Incorporating Pada Prasar Paschimottanasana into your yoga practice can enhance flexibility, promote relaxation, and support overall well-being. As with any yoga practice, listen to your body, honor its limitations, and seek guidance from a qualified instructor if needed.
Learn to know more about yoga asana so you can visit best yoga school in rishikesh and join kundalini yoga teacher training and prenatal yoga teacher training


